February 9, 2016
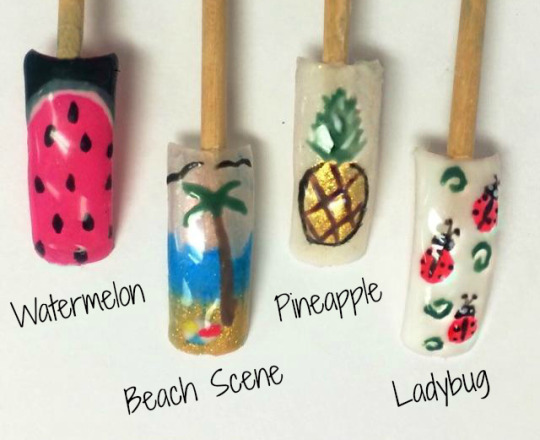
DIY : 4 FUN DESIGNS PERFECT FOR SUMMER!
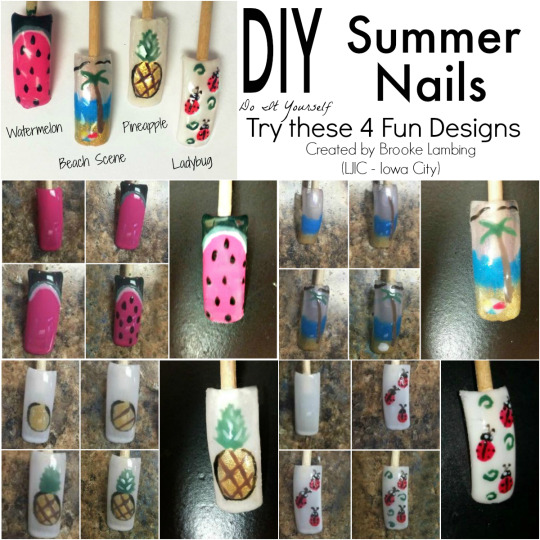
The warm weather is here and it’s time to have some summer fun with your nails. Next time you’re changing your polish give one of these easy tutorials a try! Today’s LJIC Tues-Torial was created by Brooke Lambing (Cosmetology student at La’ James International College in Iowa City)
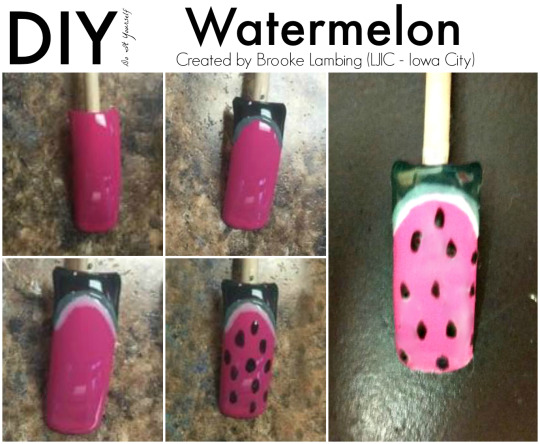
Watermelon
- Step 1: Apply a pink color. Brooke used CND Vinylux Hot Pop Pink for her base color.
- Step 2: Create a curve at the bottom of the nail with a darker green polish. Then mix your green with a white polish to create a lighter shade of green and paint another small strip above the dark green. Brooked used CND Vinylux Serene Green & CND Vinylux Studio White.
- Step 3: Next take your white polish and paint another small strip above your light green color. CND Vinylux Studio White was the color Brooke used for this step.
- Step 4: Using a black polish, randomly add small dots to create the watermelon seeds. Brooke used CND Vinylux Black Pool.
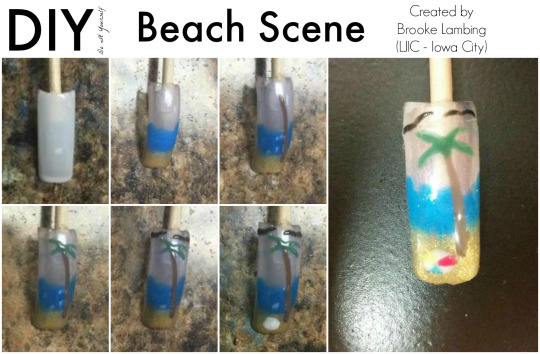
Beach Scene
- Step 1: Choose an off white polish for your base color. Brooke used CND Vinylux Negligee. Next, to create the sand & water pick your favorite shimmering yellow & blue. Brooke used CND Spectrum Shimmer Additives & CND Cerulean Blue Shimmer Additives.
- Step 2: For the tree trunk, choose a brown polish and paint a line down the middle of the nail. CND Vinylux Rubble was used here.
- Step 3: Next create the palm leaves & birds. Brooke mixed CND Vinylux Serene Green & CND Vinylux Studio White to create the perfect green for this step. For the birds Brooke used CND Vinylux Black Pool.
- Step 4: Time to make the Beach Ball. With white polish, apply a big dot in the sand. With red polish apply a small stripe on your white ball. Continue doing the same thing with yellow & blue. Brooke used CND Vinylux Studio White, CND Vinylux Lobster Roll, CND Vinylux Bicycle Yellow & CND Vinylux Cerulean Blue.
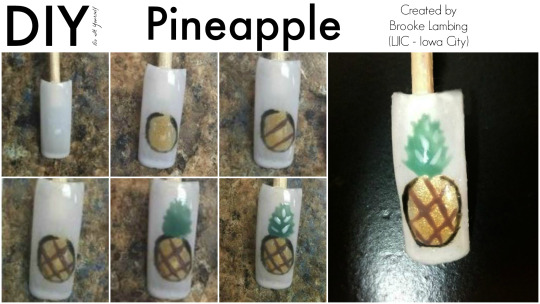
Pineapple
- Step 1: Apply a white polish for the base color. Next, using a yellow color create the base of the pineapple. Then outline the pineapple with a black polish. Brooke used CND Vinylux Studio White, CND Spectrum Shimmer Additives & CND Vinylux Black Pool)
- Step 2: Using your black polish, paint diagonal lines through the pineapple. Then do the same thing going in the other direction to create a criss-cross pattern.
- Step 3: Next create the pineapple topper with a green polish. Brooke mixed CND Vinylux Studio White & CND Vinylux Serene Green forming the perfect shade of green.
- Step 4: Use a white polish to add a little detail to your pineapple leafs. Brooke chose CND Vinylux Studio White.
Ladybug
- Step 1: Choose a white polish for the base of the nail. Brooke used CND Vinylux Studio White.
- Step 2: Add small dots of red to create the ladybug bodies. Next, use a black polish to create details. First apply a thin line down the center of your dot to form the wings. Apply another small dot at the top to form the head. And lastly, add tiny dots to form the spots. Brooke used CND Vinylux Lobster Roll & CND Vinylux Black Pool.
- Step 3: Add tiny white dots to create eyes. Brooke used CND Vinylux Studio White.
- Step 4: For extra fun & a little pop of color, create small swirls in the empty space between the ladybugs. Brooke mixed CND Vinylux Studio White & CND Vinylux Serene Green to create the perfect shade of green.
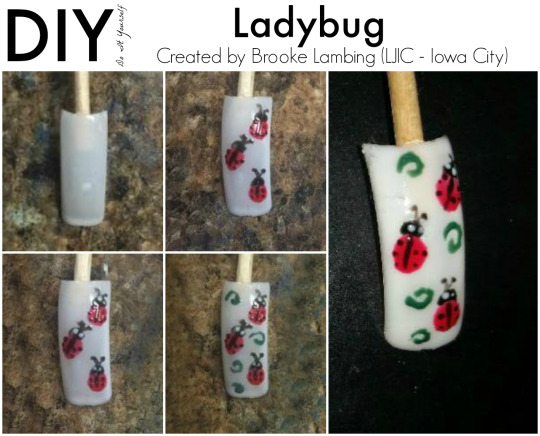
Excellent job Brooke and thank you for participating in this week’s LJIC Tues-Torial!
If you’re interested in learning more about upcoming programs and starting your journey at La’ James International College then call 888-880-2108 or visit www.LJIC.edu today!
BECOME A PART OF THE LJIC FAMILY TODAY!

Leave a Reply