Embark on a DIY nail art adventure with this enchanting Pot of Gold nail art design that will transform your nails into miniature treasures. This easy-to-follow guide will provide you with techniques to create this stunning nail design.
Published: March 21, 2017
Last updated: August 23, 2024
DIY Pot of Gold Nail Art
DIY Pot of Gold Nail Art Tutorial
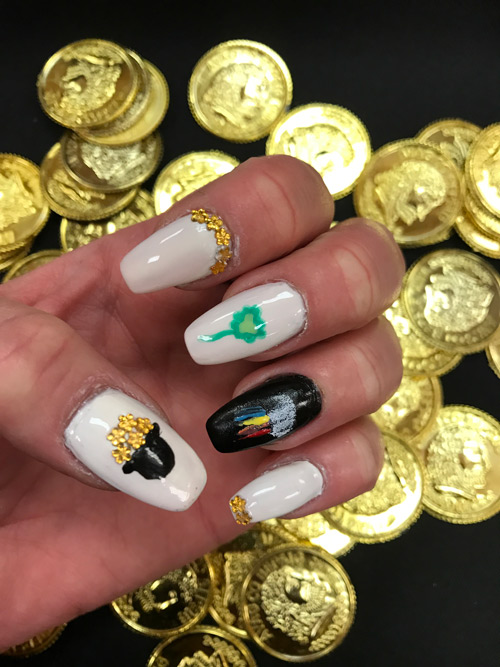
Our student, Blair Lensing from our Fort Dodge Cosmetology School, shares necessary ingredients and steps to creating this cute Pot of Gold nail art! Check it out & Try it out!
What you need
Before you start, you need to gather all the necessary nail equipment for this tutorial.
- CND Vinylux Cream Puff
- CND Vinylux Black Pool
- CND Vinylux Limeade
- CND Vinylux Convertible
- CND Top Coat
- Gold gems
- Sponge
How to do it?
In this tutorial, our student Blair laid out important steps to follow. Follow these simple and easy steps to create a stunning Pot of Gold nail design:
- Step 1: Use CND Vinylux Cream Puff for the base color & CND Vinylux Black Pool for the accent nail.
- Step 2: Use CND Vinylux Black Pool & gold gems to create the pot of gold on the thumb.
- Step 3: Then put 5 gold gems at the base of the pointer finger & 2 gold gems across the top of the pinky finger.
- Step 4: Paint a cloud and rainbow onto a sponge. Then press the sponge on the ring finger as if you were using a stamp.
- Step 5: For the middle finger, use CND Vinylux Limeade and CND Vinylux Convertible to free hand a clover.
- Step 6: Finish your look with CND Top Coat.
Common Mistakes to Avoid & Tips
Although this nail art design is quite simple and easy to do, mistakes can happen. Here are some common ones to avoid & what to do instead when creating Pot of Gold nail art:
- Smudging of nail polish: Use a thin coat of nail polish, and allow each layer to dry completely before applying another one. You can also apply a base coat for a smooth application.
- Bumpy texture: Apply thin layers of nail polish, and opt for high-quality nail polish. You can also use nail polish thinner to smooth out bumps.
- Difficulty creating clean lines: Use a nail polish remover-dipped toothpick to clean up any mistakes.
- Difficulty creating the rainbow arch: Use a thin nail polish brush and slowly paint the arch from one end of the nail to the other.
Wrapping Up
Our student, Blair, showed you how to create this stunning design without any hassle and in no time. Thank you, Blair, for sharing the tips to creating this fun Pot of Gold look for today’s #LjicTuesTorial!
Interested in Nail Design?
Interested to learn more about nail school? Contact a Career Planner to learn more about La’ James International College and upcoming classes. Call 888.880.2108.
Leave a Reply